Thursday, November 8, 2012

Problems, chelation, and other things.

I know it has been a while since any type of update.  Things have ended up taking time away from the mustang.  The oil pan gasket in my daily driver blew and dumped all my oil in about 30 seconds, and the engine seized up about as quickly.  Needless to say that meant finding a replacement engine and getting the old one out and new one installed.  Result, two weeks of time wasted on the car that I don't really want to be working on.


Also I spent several weeks building a chestplate for a costume my wife wanted to do.  This was something that I really didn't mind doing.  It took as long as it did because I had to do it perfect.  It involved taking a mold of my wife's chest using plaster wrap and plaster of paris.  Lots of sanding and shaping before molding the whole thing with fiberglass.  More sanding and shaping after that had cured.  Then bondo, sand, more bondo, sanding, glazing putty, primer, sanding, primer, painting, masking, painting, and clear.  I think it turned out looking pretty darn good if I do say so myself.  In fact according to friends, I need to make these things for them.  Not so sure about that.
If you haven't figured it out, she's Baroness from GI Joe.
Here's the closeup.
Anyway onto the car.  Basically here are the things I have managed to do to it when I have had time.  I cleaned and rebuilt one of the door hinges and started on a second one.  As a result I have removed the old driver's side door and don't plan on reinstalling it.  I have a replacement that needs to be cleaned up and installed instead.  Finally I fabbed up a patch for the A pillar down near the rocker and got that welded in.  Shall we get into the details then?

Here it is after chelation and before paint removal.


Wait, chelation?  What is that?  Basically it is where you put it in a solution the converts the rust and gets rid of it.  For a better explanation, you can go here.  http://1970boss302.blogspot.com/2011/06/thinking-outside-rusty-box-i-think-im.html This is where I first discovered it.  After my own research, I discovered that molasses can be used to do the same thing.  All you have to do is mix your molasses with water at a ratio of 10:1 or 9:1 depending on which source you look at.  You then dump the part in and leave it for a week or three.  When it comes out, simply clean off the part with water and a brush.  Voila!  Rust is gone.  If you arene't going to paint the part, you do need to protect it with something like wd40, otherwise it can get surface rust pretty easily.  I ended up taking the wire wheel to it and getting rid of the paint, wiping it down and painting it with Zero Rust.

Here is the upper hinge.

Here is where it will stay for about two weeks until it reaches it's proper aged vintage.

Lower hinge down to metal and painted.

Before I did this I had to disassemble the whole thing.  What a pain in the keister!  I had to drill out every last pin and then pound out the remainder with a punch. I hope the other side isn't as bad.  Anyway, I then took it into work and used the press to get the new pins installed and the whole thing assembled.

Cleaned, painted, rebuilt and ready for 40 more years.

Next thing was getting the patch to replace the rusted area on the a pillar.  I didn't want to replace the whole thing as A) replacements cost over $100, only available as a pair B) the pass side is pretty good and C) This is the worst of the rust.  So I cut some pieces out of the fender apron I am not going to use because it doesn't fit, and shaped the pieces according the the paper templates I made of the area.  Welded the whole thing in and primered it so it would be protected as we head into winter here.

You can just see the rust hole down at the bottom.  The whole area was completely rusted out.  It practically fell apart when I started taking this out.


Here is the area after cutting out the rust and welding in the first part of the patch.  I'm not worried about all the rust on the rocker as I plan to replace the whole thing a little later. It is beyond the effort of trying to repair.   I'm hoping to get it done before the end of the year.  We'll see if that happens, there is a storm that is supposed to hit this weekend.

Checking fitment of the second part of the patch.

Everything welded and ground down.

Add primer and it looks like it belongs there.  Just minor imperfections that some filler should take care of.
I know it's not a big update, but it is an update nonetheless.  On a side note, I was driving down the street when this flew past me.  I had to go stalker on the poor guy and when he stopped for gas a mile down the road I snapped some photos of it.  It is a Shelby clone that he is just about finished putting together.  I didn't find out much else about it as I was in a bit of a hurry, and so was he.  I just hope my car looks as good when I'm done.

Vroom!  Hey!  What was that!

Must follow!

Love the color, I couldn't help but drool a little.  Fortunately it didn't get on the car.

You can see here where he still has some work on the front of the car.

Thursday, September 27, 2012

Torque box part 1

This week I managed to get the bottom half of the torque box installed after much test fitting the week before.  Not much really to tell about it, it was a pretty straight forward install after the problems were taken care of from earlier.  The pictures will tell the rest of the story.  I won't be installing the inner portion of the box until I have replaced the complete rocker on this side.  I decided I wanted to have some extra working room, but the help of the box to make sure I get the rocker properly aligned.
Tacking the box to the frame rail.

These are high clamping force clecos.  They are great for getting things flush and tight.  I may have to purchase a few more.

Completely bead welded to the frame rail and flux cleaned off.  I think my welds are starting to look better.

Box welded to floor support.

Welds cleaned up, some of the e-coat stripped back, and black Zero-Rust painted on.  I didn't paint the whole box because the e-coat was still good, and I may mess it up some more while working around the area.

Bottom of box, welds cleaned up and painted with Zero-Rust.  I really like how well the Zero-Rust sprays on right out of the aerosol can.  The coverage is good and it is easy to get it into all the nooks and crannies.  I think I will be picking up more of  this stuff.  Hopefully it lives up to it's rust protection promise as it is cheaper than stuff like POR-15.  Not to mention I have seen people who have not had much success with the POR-15.  You can check out this person's experience with it here.  POR-15 The Truth

On the left you can see the cheaper passenger side battery apron.  Next to it is the Dynacorn version.  The Dynacorn is a much better stamping and it is a half inch longer at the bottom.  When I test fit the one on the left it was lacking in that area.  The Dynacorn was practically a perfect fit.  Well worth the extra cost.  Wish I had known this before I purchased the other one.  I will definitely be writing a review on CJP for the parts.  Hopefully someone else won't have to buy it twice like I did.  At least I now have a piece that I can cut up into patch pieces, right?  I don't know when I will actually install this piece as I need to pull the shock tower back into alignment.  When doing the fitting of these pieces I discovered the shock tower needs to come forward about 3/4 of an inch and to the left 1/4 of an inch.  I'll have to look into how to get it back into place.  I might have to cut it free of everything and massage it back into place with my BFH.  Ugh.

Tuesday, September 18, 2012

Up to date

I think with this post, things will be up to date and all my posts from here on out should be pretty close to the date I have been doing everything.

One of the things I decided to replace because it wasn't to expensive was the transmission tunnel support brace.  I ordered it and cut out the old one using my spot weld cutter from harbor freight.  I have enjoyed the use of this tool, but you do need to be a little bit careful using it as it can break teeth off if you don't keep it straight.  I welded the new support in using the holes I drilled with the cutter.

I then worked on getting the driver side floor support in.  I painted it on primer and using the dimensions on the data sheet lined everything up according to the locating holes.  This actually caused a problem a little bit later.

I drilled out 36 new holes for welding the support onto the frame and the trans support.  Everything went in well and the welds looked really strong.  In fact I basically hung off it to test the strength.  I must be getting better at my welding.
All those little holes are where rivets were used.  What a mess, I filled all of them with weld before fitting the support.

 Support fitting.

 Support is welded in.


Next thing on the list was to get the torque box into place.  I spent several hours working at the fitment of the piece and it just wasn't working.  I then got to looking at the floor support I had welded in.  Something didn't seem right.  I pulled out my tape measure and started taking measurements.  Everything lined fine and matched the measurements I had.  I then measured the other floor support that I haven't taken out yet.  Amazingly enough, the new aftermarket support was actually about 1/2" to long.  Wish I knew about it earlier, I would have adjusted for the difference.  Oh well, I measured and prepared to take about a 1/2" off the front end to give the torque box room.  I marked it with my sharpie and laid down a line of blue tape to make sure everything was straight.  I then preceded to cut into to piece.  I took slow and tried to follow the tape line with the angle grinder.  I then grabbed the dremel and finished the cut with it.  After getting the cut piece out of the way, I proceeded to fit the torque box.  Everything lined up great!

I haven't welded it in yet, I am waiting for some high draw wing nut clecos to help me keep everything tight as I weld it.  I first saw these on SW Pruett's Boss 302 project and decided I needed some of these to go with my set of regular clecos.  You can get to his blog here http://1970boss302.blogspot.com/  I also have to drill and prep the torque box for welding.  After it is in, I will probably buy some zero rust and paint the entire thing with it.

Here you can see how much I cut off.
The fit is much better now.
Inside of torque box during fitting.
I am really glad I bought the Dynacorn two piece torque box.  It made fitting so much easier.
Front of torque box.
Bottom of torque box.  You can see how everything is parallel.  It wasn't that way when I first tried to get it fit into place.  It was starting to drive me nuts!

Here are some things that people might find interesting.
Rusted out hood, it is so not worth trying to fix all that rust.  The hood would probably fall apart if I tried to media blast it.
Here lies the remains of the rotten metal, may it rest in piece.
Remains of the rusted front suspension.
New parts to go in, they are patiently waiting for their turn to bring this car back to life.
More new parts.

Here is the Marti Auto Works report on my car.  As you can see there really wasn't anything to special about it.  It means I don't feel bad about not making a concours car.

Saturday, September 15, 2012

The tear down really begins.


Well here we are, the tear down is beginning.  I got the car up on the jack stands and wheels off the car.  I started pulling off the front suspension.  It was not easy.  Everything was rusted pretty hard in place.  I was trying to get it off in as much of one piece as I could.  There were a few bolts that no matter what I did with them, I still had to cut them off.  After a couple of days I had most of the front suspension off.  Next was to get the steering column and steering box off the car.  I ended up just detaching everything from the car, removed the steering wheel and column and then pushed everything out through the firewall.  The whole suspension seems to be in pretty bad shape.  Good thing I plan on replacing it all anyway.

I was pretty sure that the frame rails were in bad shape and after getting everything pulled, my suspicions were confirmed.  I had now poked my screwdriver through pretty much every part of the bottom of the driver side frame rail, and quite a few places on the sides.  Guess, I need one of those.  The fender aprons were also pretty much needing to be replaced as the ones on the car were lousy bent ones riveted on by a previous owner.  They did however match the floor pans which were handmade and riveted as well.  the front radiator support was also jacked up from the PO trying to make it fit his panels.  All those panels had also rusted!  What a mess!

At this point I started going over the car trying to figure out what all I might need to replace and where to truly get started on all this metalwork.  After I had decided to start on the front and kinda work my way back, I took my bonus from work and my tax return and started getting parts.  I picked up a Lincoln handy mig welder and got on CJ pony parts and started ordering a bunch of stuff because they had a sale on at the time.  I picked up a new LF frame rail, aprons, floors pans, floor supports, radiator support and various other parts I knew I needed at this point.

I decided to work my way back, one side at a time.  In order to make it easier to work on the frame I decided the bad floor had to come out on the driver's side.  The lousy PO had riveted angle iron to the rockers, and then riveted the pans to that and the tunnel.  He also must have used the most goopy sealant he could find, I got it all over myself.  After scraping that goop off, and crying over the new exposed rusted metal, I grabbed some Goo Gone and cleaned the rest of the goop off.  After pulling the toe board, I found out that the torque box had been hacked up, and the side cowl panel as well.  Ordered that stuff as well then.

Time to figure out how to replace this frame rail properly.  After getting on the forums and getting advice, I determined that I needed some type of frame jig, lots of measurements and the data sheet with the official measurements on it.  I found the data sheet on ebay for a reasonable price and got it.  Next I thought about how to set up a jig of some kind that would help me keep my measurements close to where they needed to be.  You can see what I came up with in the pics below.  It ended up working rather well for only costing me a few dollars and some leftover 2x4's I had laying around.

After getting my measurements, I finally cut out all the offending parts of the frame rail, torque box, radiator support, and the LF apron.  I fit the frame rail, and then pulled it and tweaked the fit, and pulled it, and tweaked it, and I kept doing this till I was happy with how everything fit.  I made sure the radiator support fit, the rail fit, the torque box, and floor support.  I didn't worry to much at the torque box because I knew that I would have to worry about it more later after I had the rest welded in. so it was more of a loose fit.  This ended up causing some problems later down the line.  I'll talk about that later.

After I was happy with the fit, and all my measurements, and the measurements from the data sheet were in agreement, I knew it was time to weld it in.  So I pulled out the welder and looked at it.  I had never welded before in my life.  I took time and found everything I could about welding, I even looked at several books on the subject.  After getting an understanding of how things were supposed to work, I set it up and started practicing on pieces of the old floor.  After I felt that I had a good feel for what I was doing I went to the car and tacked the rail in place, refit everything, checked my measurements yet again and decided I was happy with where it was.

I welded on the radiator support and LF apron.  I decided to wait on the floor support so that I could have some room to work in that area.  The pics should take you up to that point.  Enjoy.


Look, good metal on the spindles!  Too bad the rest of it is pretty rusty. :(


From what I can tell the firewall is in pretty good shape.  There is some rust, but I can patch it pretty easily.  Over on the driver side where the cowl vents are rusted out, I found quite a few pinholes on it.  I have a patch for that area to put in at some later date.

Can you see the fourth hole down at the bottom that doesn't belong?  I barely had to use any pressure to push my screwdriver all the way through.


Half the torque box is missing.  There is also a ton of sealer in here and it is super goopy.

Here you can see my jig.  There are marks on the cement to insure I get it lined up the same everytime.


Test fit with old rail to get measurements.


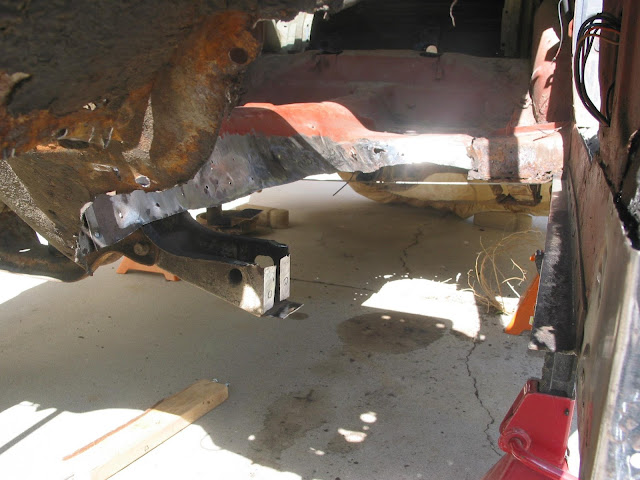
Yep that's right, rear torque box is pretty shot, looks just as bad from underneath.


More rust and bad repairs.


Test fit


And more test fitting.


torque box test fit.

Here you can see some of the angle iron riveted to the rocker.  As far as I can tell from what I have pulled off, it has rusted the inner rocker all the way down.

Plug weld holes drilled and test fit.

Welded and partially ground down.

Apron test fit.  Ignore the old pair of pants in the back, I've been using it as a rag.


Welded in. It is amazing how strong these pieces become with everything  welded together.


Fitting the fender and finding where the mounting holes need to be cut at.  By the way, I did do extensive test fitting of the fender before I welded the apron in.  I just don't have pics of that process.


Marked the location and started cutting out the holes with my trusty dremel.